iptables
示例
iptables -I INPUT -p udp -m multiport --dports 60000:61000 -j ACCEPT
按 TTL 匹配
iptables -I INPUT -m ttl --ttl-gt 200 -j DROP
接受已建立的连接(不用再看之后的规则了,在跳过规则较多时可提升性能):
iptables -I INPUT -m state --state RELATED,ESTABLISHED -j ACCEPT
访问控制
限速
限制从本地到本地 6900 和 6901 端口的速率为每秒一个数据包。注意在默认接受的策略下,需要指定丢弃多余的数据包。受 bbr 等算法的影响,不同目标的实际速率(字节)会不一样。
iptables -A INPUT -s 127.0.0.1 -p tcp --dport 6900:6901 -d 127.0.0.1 -m limit --limit 1/s -j ACCEPT
iptables -A INPUT -s 127.0.0.1 -p tcp --dport 6900:6901 -d 127.0.0.1 -j DROP
限制最大速率为 100KiB/s:
iptables -A INPUT -p all -m hashlimit --hashlimit-above 100kb/s --hashlimit-name slow -j DROP
阻止暴力破解
阻止暴力破解 ssh 的尝试,每分钟只允许尝试四次连接到 22 端口:[2]
iptables -I INPUT -p tcp --dport 22 -i eth0 -m state --state NEW -m recent --set
iptables -I INPUT -p tcp --dport 22 -i eth0 -m state --state NEW -m recent --update --seconds 60 --hitcount 4 -j DROP
丢弃开头的包
丢弃连接刚开始的、指定(IP 包)长度的两个 UDP 包,限制 DoS 攻击(用于一次针对 teeworlds 的攻击 ):
iptables -A INPUT -p udp --dport 8303 -m length --length 32 -m recent --name attack --set
iptables -A INPUT -p udp --dport 8303 -m length --length 32 -m recent --name attack --rcheck --seconds 60 --hitcount 3 -j ACCEPT
iptables -A INPUT -p udp --dport 8303 -m length --length 32 -j DROP
iptables -A INPUT -p udp --dport 8303 -m length --length 40 -m recent --name attack --set
iptables -A INPUT -p udp --dport 8303 -m length --length 40 -m recent --name attack --rcheck --seconds 60 --hitcount 3 -j ACCEPT
iptables -A INPUT -p udp --dport 8303 -m length --length 40 -j DROP
只允许 Cloudflare 访问
(IP数据于2014年12月3日更新,只包含 IPv4 部分)
ips=(
  199.27.128.0/21
  173.245.48.0/20
  103.21.244.0/22
  103.22.200.0/22
  103.31.4.0/22
  141.101.64.0/18
  108.162.192.0/18
  190.93.240.0/20
  188.114.96.0/20
  197.234.240.0/22
  198.41.128.0/17
  162.158.0.0/15
  104.16.0.0/12
)
for ip in $ips; do
  iptables -A INPUT -s $ip -p tcp --dport 443 -j ACCEPT
done
iptables -A INPUT -p tcp --dport 443 -j REJECT --reject-with tcp-reset
配置 NAT
echo 1 | sudo tee /proc/sys/net/ipv4/ip_forward
sudo iptables --table nat --append POSTROUTING --out-interface eth0 -j MASQUERADE
sudo iptables --append FORWARD --in-interface vboxnet0 -j ACCEPT
另一例,不指定-o参数,会按路由表分发。
iptables -t nat -A POSTROUTING -s 192.168.56.0/24 -j MASQUERADE
TCP 重定向
来源为局域网的重定向:
# 到本机(本网络接口?)
iptables -t nat -I PREROUTING -p tcp --dport 80 -d forum.ubuntu.org.cn -j REDIRECT --to-ports 8080
# 到其它主机(其它网络接口?)
iptables -t nat -A PREROUTING -s 192.168.56.7 -p tcp -m tcp --dport 80 -j DNAT --to-destination 192.168.56.1:9999
注意:使用 --to-destination 重定向其它接口的流量到127.0.0.1并不生效,除非设置 sysctl net.ipv4.conf.all.route_localnet=1。但是这样有安全隐患(外部可访问到 127.0.0.1)。推荐监听其它 IP(可在 lo 上添加其它 IP)来绕过这个限制。
来源为本地的重定向(可用来支持透明代理)
# 到本机
iptables -t nat -I OUTPUT -p tcp --dport 80 -d forum.ubuntu.org.cn -j REDIRECT --to-ports 8080
# 到其它主机
iptables -t nat -I OUTPUT -p tcp --dport 80 -d forum.ubuntu.org.cn -j DNAT --to-destination 192.168.56.1:9999
注意:DNAT需要配合SNAT或者MASQUERADE来使用。例如:
ip6tables -t nat -A PREROUTING -p tcp -m multiport --dports 80,443 -j DNAT --to-destination 192.168.57.1
ip6tables -t nat -A POSTROUTING -d fc00::/64 -j MASQUERADE
# 或者
# ip6tables -t nat -A POSTROUTING -p tcp -d fc00::1 -m multiport --sports 80,443 -j SNAT --to-source fc00::2
可以使用 conntrack -L 来列出连接跟踪的详情以便排查问题。
UDP 重定向
使用 TPROXY[4]。注意:对于出站流量需要设置一个与原有的不同的 mark 之后才能被匹配到。
ip rule add fwmark 1 lookup 100
ip route add local 0.0.0.0/0 dev lo table 100
iptables -t mangle -A OUTPUT -p udp -d 1.1.1.1 --dport 53 -j MARK --set-mark 1
iptables -t mangle -A PREROUTING -p udp -d 1.1.1.1 --dport 53 -j TPROXY --on-port 7112 --on-ip 127.0.0.1
对于经过的流量:
ip rule add fwmark 1 lookup 100
ip route add local 0.0.0.0/0 dev lo table 100
iptables -t mangle -A PREROUTING -p udp -d 1.1.1.1 --dport 53 -j TPROXY --on-port 7112 --on-ip 127.0.0.1 --tproxy-mark 1
注意:按 mark 路由的话,要将 mark 打在 tproxy 规则之前!
需要对代理程序设置权限cap_net_admin,cap_net_bind_service=ep。
按用户/组匹配
iptables 的 owner 匹配扩展添加了以下几个匹配条件:[5]
--uid-owner UID: 按进程的用户 ID 匹配--gid-owner GID: 按进程的组 ID 匹配--sid-owner SID: 按进程的会话 ID 匹配
用户 ID 和组 ID 也可以写用户名和组名。
注意组 ID 是针对进程而不是用户的,所以即使一个用户是某个组的成员,其所启动的进程也可能不匹配这个组。[6]
示例:
iptables -t nat -I OUTPUT -p tcp -m owner --uid-owner redsocks -j RETURN
将特定的数据包转到指定的网络接口
iptables -w -t nat -A POSTROUTING -s 192.168.199.0/24 -o wg0 -j SNAT --to-source 192.168.58.1
iptables -w -t mangle -A OUTPUT -p udp -d 8.8.8.8 -m udp --dport 53 -j MARK --set-mark 8
ip rule add fwmark 8 lookup 8
ip r add 8.8.8.8/32 via 192.168.58.3 table 8
相关命令
iptables-save保存当前配置到 stdout,iptables-restore清除原有配置并从 stdin 载入配置。
参见
外部链接
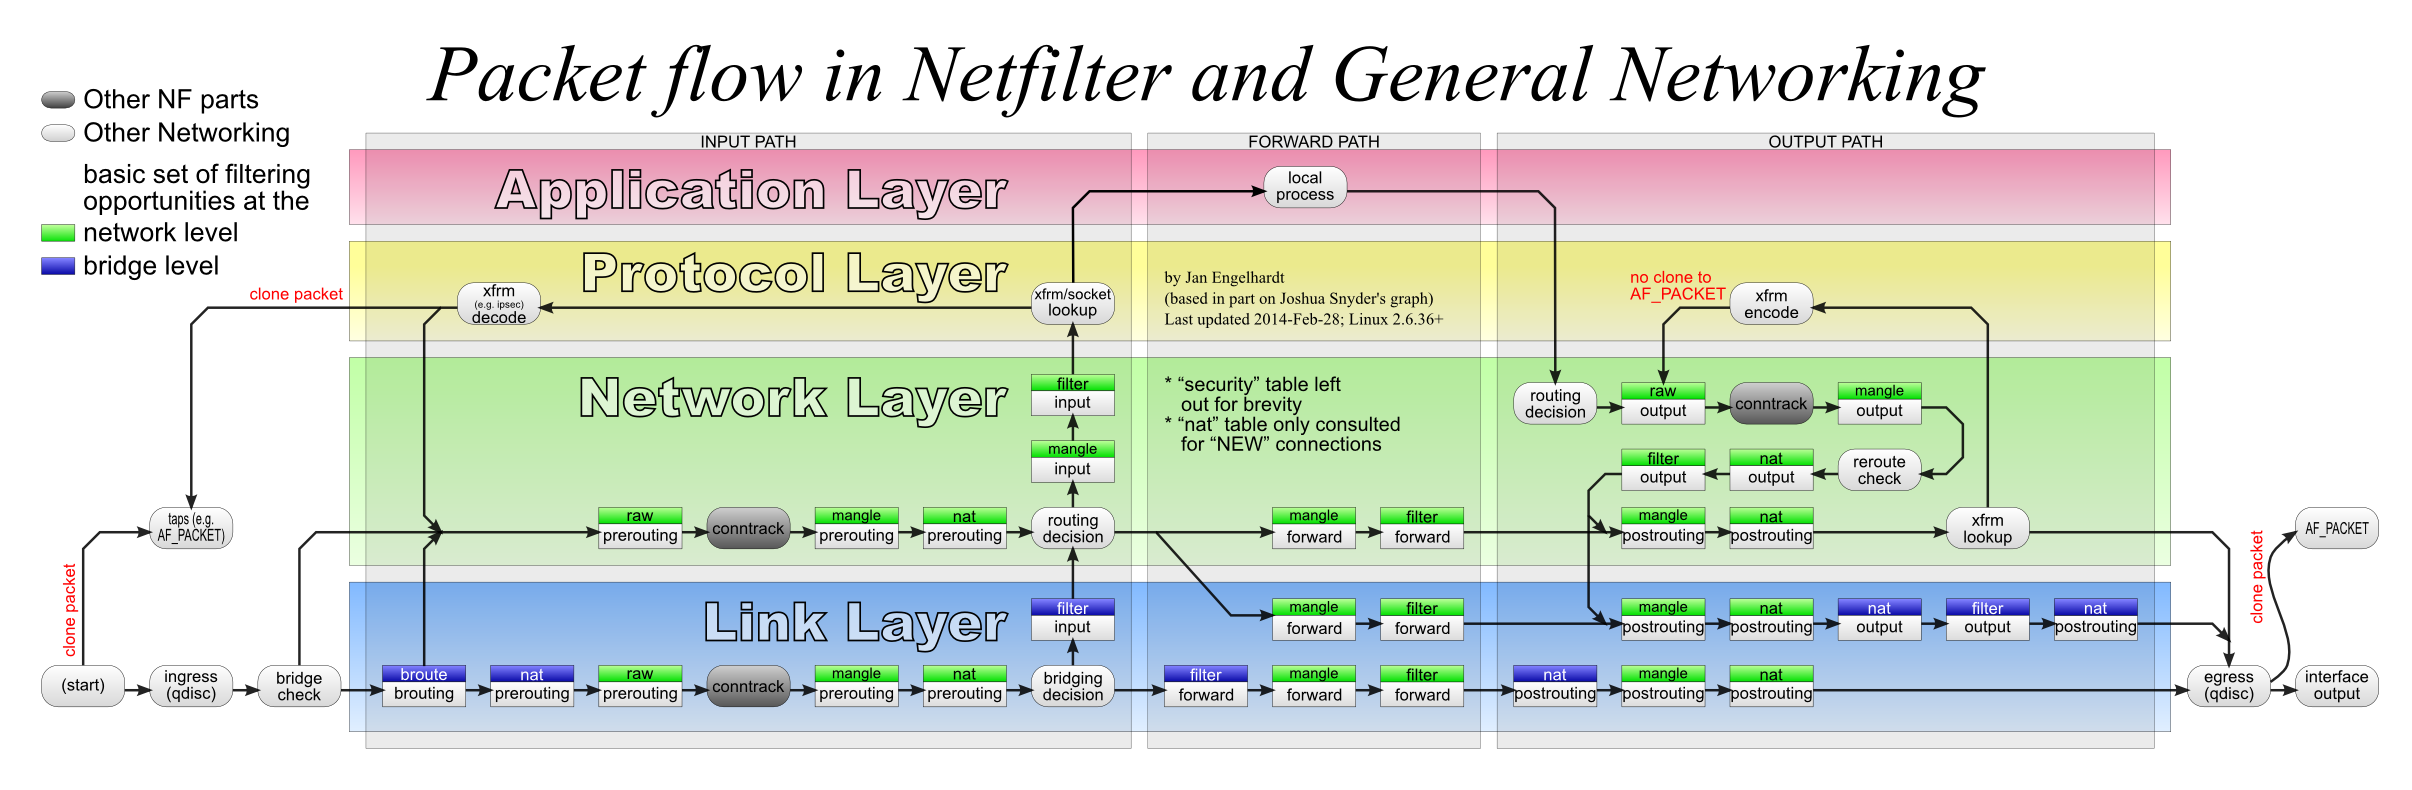
- Packet flow in Netfilter and General Networking (图)
- Man page of iptables-extensions
- HowTos/Network/IPTables - CentOS Wiki
- Upside-Down-Ternet
- Iptables Drop IP Address
- How To Reset Linux Firewall Automatically While Testing Configuration With Remote Server Over SSH Session
- Netfilter Extensions HOWTO, 一些额外的 iptables 模块。
- Iptables Tutorial 1.2.1
- 防DDoS脚本 in python | observer专栏杂记,使用 Python 动态创建和删除 iptables 规则
- fail2ban 使用 iptables-xt_recent 代替 iptables-multiport | What's up, LUG Servers
- Netfilter 框架笔记 | the 3rd. Place
- Using NFQUEUE and libnetfilter_queue » To Linux and beyond !
- Iptables REDIRECT vs. DNAT vs. TPROXY
- Brilliant Place: Reply UDP with correct source address on a multihomed Linux server
- Mass-blocking IP addresses with ipset » d(a)emonkeeper's purgatory: iptables 和 ipset 的屏蔽效率对比
- Abusing Linux's firewall: the hack that allowed us to build Spectrum TPROXY
参考资料
- ↑ iptables rules for Mosh connections | Useful Snippets
- ↑ Using iptables to rate-limit incoming connections
- ↑ 一个使用iptables配置NAT的实例 - Zhaoke Blog已失效,存档
- ↑ 透明代理 UDP 为什么要用 TProxy? - 简书
- ↑ How to Limit network access by user / group using iptables - Owner Match | Linux Blog
- ↑ firewall - iptables --gid-owner works only for user's main group - Stack Overflow